
Can I DIY Epoxy flooring?
Can I simply DIY epoxy? Why are the professionals so much more expensive than I thought? Whats the big difference?
Brady Green - CEO
4/24/20256 min read
To give you the quick answer: yes. Just like with all trades, everything is possible to DIY — but at what cost? It all comes down to the kind of quality you value.
We’ve all seen those kits at Home Depot and thought to ourselves, "It can’t be that hard, right?" Power wash the floor (or maybe acid wash it), mix it up, throw some flake down, and topcoat — done, right? But just like anything else in the trades, it’s never that simple.
There’s a saying we go by in this industry: if you can buy it off the shelf at a big box store, it’s probably not the right product for the job. And that’s for a few good reasons — unprofessional instructions, cheap materials, and overhyped claims that set false expectations.
Let’s break it down.
First and foremost, let’s talk prep.
I can’t stress this enough: your coating is only as good as what it’s sticking to.
You could have the best epoxy on the market, but if you roll it onto a poorly prepped surface — especially one that’s been power troweled (which most garage slabs are) — it’s not going to last. In fact, I’d bet that a cheap, low-solids epoxy from a big box store applied to a professionally prepped floor will outlast a premium product on an unprepped one.
Here’s why.
Almost all concrete surfaces have some combination of unreacted salts, surface contaminants, laitance (also known as capping), and low permeability. These all create adhesion issues for coatings. Power washing or even acid etching doesn’t solve those problems — it just cleans the surface. It doesn’t remove them. What’s needed is mechanical abrasion — the removal of the top 1/12" to 1/8" of the concrete slab. This process not only strips away the weak, contaminated surface layer, but it also opens up the concrete to accept coatings more effectively. By removing the “capped” or power-troweled layer, you expose fresh, more porous concrete and deeper aggregate. This gives the coating something clean, absorbent, and structurally sound to bond to. It also allows the material to wrap around the exposed stone, creating a much stronger mechanical grip — and ultimately, a longer-lasting floor. Want proof? Do a quick test yourself: pour some water on your power-troweled garage floor. You’ll probably notice most of it beading up on the surface instead of soaking in. Now imagine rolling an epoxy coating onto that same surface — if water can’t penetrate it, how would you expect an even higher viscosity resin to bond to it properly?
But there’s another piece: profile.
Even if you did manage to remove all the surface contaminants without mechanical prep, the slab still wouldn’t have the proper texture — or profile — for the epoxy to bond to. Epoxy coatings rely on two types of bonds: chemical bonds, which happen when the product chemically soaks into and bonds with the substrate, and mechanical bonds, which rely on surface texture — highs and lows that the coating can grip onto.
If you want long-term durability, you need both:
A clean, decontaminated surface to allow proper chemical bonding,
And a mechanically profiled slab to give the coating something to bite into.
Now, let’s talk materials.
Almost all epoxies you find at places like Home Depot, Lowe’s, or paint stores are cheap. Plain and simple. These are low solid-count products with little to no technical backing. You’ll rarely find proper TDS (Technical Data Sheets) to support the product’s quality or validate the claims made on the label.
Most of these store-bought kits fall in the 50–70% solids range and are loaded with solvents and thinners. Why? It makes the product cheaper to produce and easier for the average DIYer to apply. But that convenience comes at the cost of performance. The more thinners added, the weaker the final product becomes. Less thickness, less durability, and a much shorter lifespan. If a product is 60% solids, that means 40% of what you’re rolling onto the floor is going to evaporate. Only 60% actually cures out on the substrate.
Another issue is that these consumer-grade products rarely come with reliable TDS (Technical Data Sheets) or ASTM-tested performance data. That makes it nearly impossible to verify what you're actually putting on your floor. TDS sheets are what hold all your reliable answers of product capabilities and performance. Never simply relay on box marketing or word of mouth, always refer back to your TDS sheet for reliable answers.
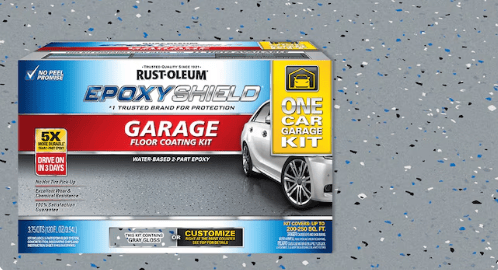
Take Rust-Oleum as an example — it’s a popular, widely available brand, but even their epoxy sits in the 50–60% solids range and relies heavily on solvents and VOCs (Volatile Organic Compounds) to fill out the formula. These thinners replace what could otherwise be durable resin, weakening the overall coating. Now to be fair, even professional coatings will have solvents. So not all products should be 100 percent solid counts. but typically, this is only found in topcoats, where a small amount helps the coating self-level and lay down smoothly. Even then, solvent content is usually limited to just 5–15%. When it comes to basecoats, low-solvent or 100% solids formulations are preferred for two key reasons: thicker build and reduced risk of off-gassing. Solvents need a way to escape, and when a basecoat is loaded with them and then top coated too quickly, it traps that vapor leading to bubbles.
Let's compare the Rust-Oleum Home Depot product TDS sheet to a professional grade epoxy.

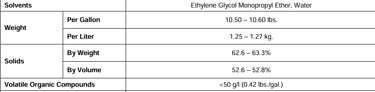
Rust-Oleum TDS
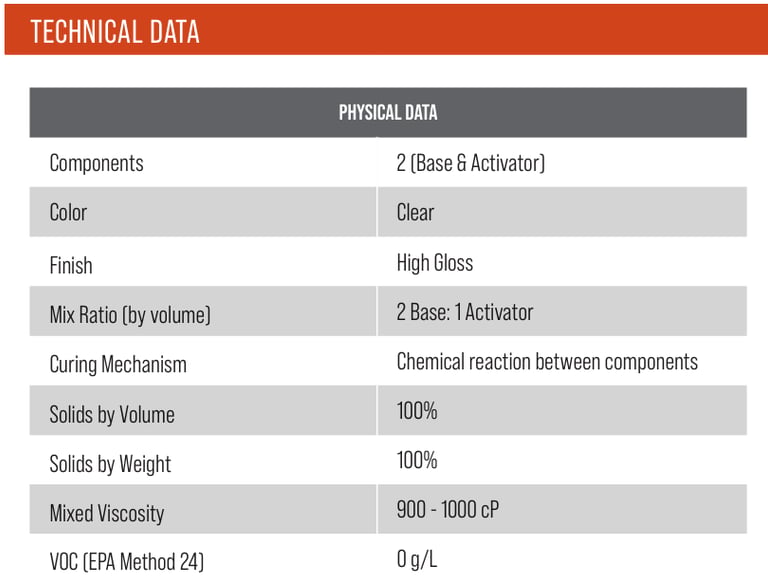

Industrial Epoxy TDS
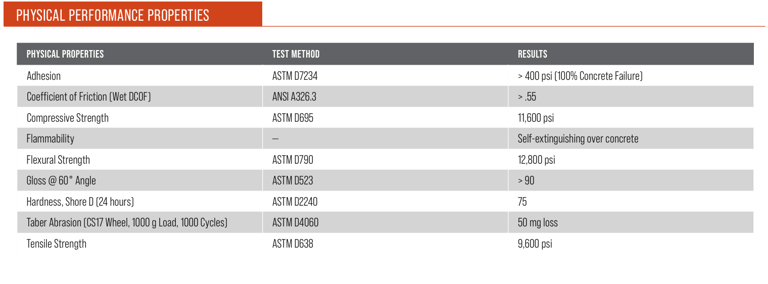
Industrial Epoxy Physical Performance Propeties
Rust-Oleum Physical Performance Propeties
N/A...
As you can see from the comparative data, the numbers are already underwhelming. But what’s even more concerning is the lack of supporting information about how these coatings actually perform under real-world stress. No abrasion resistance, no impact testing, no chemical durability — just vague claims and flashy packaging. And when a product has little to no verified performance data, that usually says all you need to know. If you want to learn a bit more about comparing products and TDS sheets, my other blog about epoxy vs polyurea dove into the depths of TDS sheets and comparative data and discusses a lot of the false hype around certain coatings and fake marketing. See Here.
Which brings me to the next point....
And last but not least — the false marketing and exaggerated product claims.
It’s everywhere with these box-store brands: “20X stronger than epoxy,” “lifetime warranty,” and other empty promises designed to earn your trust — not through performance, but through flashy labels and buzzwords. Honestly, after looking at the TDS sheets and breaking down the facts, I shouldn’t even have to explain why these claims fall apart. If these coatings were truly “5x stronger than epoxy,” where’s the technical data to prove it? Why aren’t they proudly displaying abrasion ratings, tensile strength, or impact resistance?
The logic doesn’t even add up. How can a product that’s essentially 50% epoxy and 50% solvent be stronger than a 100% solids epoxy? It’s not. What they’re doing is comparing their product to a cheap, watered-down epoxy paint — not an industrial-grade coating. And that's the difference in a lawsuit.
For context: nearly all of the industrial resin suppliers I work with don’t even offer standard epoxies below 100% solids. That alone should tell you what the pros use and why the stuff off the shelf just doesn’t stack up.
In conclusion, can you DIY epoxy? Sure. But should you?
Only if you're okay with sacrificing quality, durability, and long-term performance. What separates professional installs from DIY isn’t just tools and technique — it’s knowledge, experience, and access to real, high-performance materials.
So if you value a floor that looks great and holds up for the long haul, the smart move is trusting a professional.

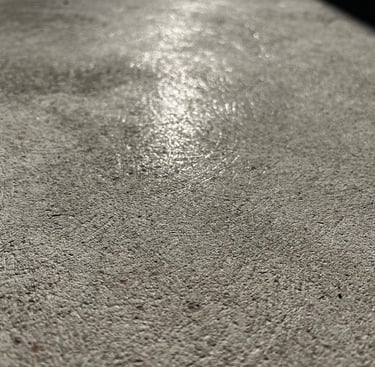
A floor after A Proper Grind -
CONTACTS
248-702-5226
Cuttingedgecoats@gmail.com


Direct Links
Clean Coat
Service Area
Oakland County
Livingston County
Washtenaw County